Sunday, December 1, 2013

Homemade Facial Moisturizer for Oily Skin


I have this awesome book called The Aromatherapy Companion, which is all about the medicinal uses for using essential oils. This book has lots of information about using essential oils safely and effectively and gives many great recipes for natural skin and body care.

I found a really easy and effective recipe for facial moisturizer for oily skin. I only like to use all natural skin care products and usually have to special order my skincare online. With the cost of the actual product and shipping, the price can really add up! So I decided to try making my own and see how I like it.

After using it for a few days, I notice that my skin is soft, smooth and supple. I like it even better than my expensive moisturizer that I special order!! I am loving how I am saving money and doing something good for my body. Here is the really easy recipe.


Facial Moisturizer for Oily Skin

  • 10 drops niaouli essential oil
  • 5 drops cypress essential oil
  • 30 ml (1 ounce) hazelnut oil
Combine all ingredients in a small dark glass bottle; shake to mix. To use: After cleansing and toning, place a few drops in the palms of your hands and massage or press lightly over your entire face.

I literally only need 2 drops of this oil and use it on my face and neck.

Tuesday, November 12, 2013

Thanksgivukkah 2013!


As you've all heard, Thanksgiving coincides with the first day of Hanukkah this year. Very exciting news for the Jews who celebrate both!

Check out my Pinterest board for some great ideas for menu planning, recipes, festive decor and more.
Thanksgivukkah 2013 Ideas


We are going all out this year at our Thanksgivukkah. Check out our final menu.

Soupe au Pistou
Free Range Turkey
Pan Fried Flounder with Homemade Tartar Sauce
Herbed Stuffing
Quinoa Stuffed Delicata Squash
Garlic and Chive Mashed Potatoes with Mushroom Gravy
Mini Potato Latkes with Cranberry Apple Sauce
Whipped Yams
Green Bean Casserole
Garlic Collard Greens
Green Salad
Cranberry Pear Sauce

Pumpkin Pie with Vanilla Ice Cream
Sweet Potato Pie
Chocolate Molasses Spice Cookies
Sufganiyot
Homemade Sparkling Apple Cider


Sunday, November 10, 2013

Upcycle Old Stuff and Make it Cool Again


We've all heard of recycling, which is good for the environment, but how about upcycling?

Upcycling is when you take something old, ugly and/or damaged and make it into something new, interesting, cool, beautiful and functional. It's basically giving something old a makeover so that it has more value than it did before. Great concept, right?

I love decorating my home and collecting interesting and beautiful pieces to make my living space more comfortable. Buying furniture and good quality decor can be fun, but it can also be very costly. I have been building my living room, one piece at a time, with used and vintage furniture that has good structure, but needs a bit of help.

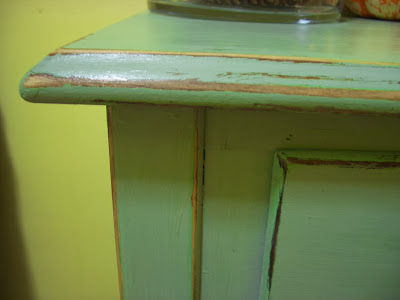
My first project for home decor is upcycling a console table. After some research, I decided to refurbish my table and give it a distressed look. I chose this style because I like the rustic chic look. It reminds me of the Autumn I spent living in the mountains of rural Vermont, doing organic gardening and getting to cook and eat freshly grown food each day. I also love having one of a kind, unique pieces of furniture and this project will turn my table into just that!

I got my wooden console table from Craigslist for $20. It is originally from Bombay Company, which I think is good quality and probably retailed for $150-200. http://www.bombaycompany.com/furniture-store/hall-console-tables

Here is my table's before picture.

I wanted a cool piece of artwork to go with the table, so I got a photo that I took from gathering flowers in the organic Vermont garden and turned it into a vibrant piece of art by getting an inexpensive "photo-to-canvas" Groupon. Once my picture was turned into a photo on canvas, I hung it up and tried to find a pretty color of green paint to match some of the green in my photo. Home Depot had a great low-VOC paint and I found my color!

I gathered all of my supplies from Home Depot. I think this was seriously my first time going in there by myself, and I obviously had no idea what I was doing, but I found someone to help me.

I bought:
a few sheets of 60 coarse grit sandpaper
tack cloth
2 medium sized paint brushes
a 30 oz. container of light green paint
polyacrylic protective finish

Once I gathered my supplies, I got to work. I took guidance primarily from
http://upcycledtreasures.com/2013/06/beach-inspired-console-table/
http://www.hgtv.com/handmade/how-to-distress-furniture/index.html
http://www.youtube.com/watch?v=tEYRjltR0jM

First I detached the drawer handles and took out the drawers. I then sanded the entire piece of furniture by hand. Make sure you have enough sandpaper if you have a large piece. Here is the table top after sanding:

Once I sanded everything, I painted the whole table and drawer fronts with one coat of paint. I then let it dry and did a second coat of paint.

Once the second coat of paint dried, I used sandpaper and sanded away paint on the corners of the table and any edges, where paint might normally come off of an old table. You want the piece to look worn out and old. You can sand as little or as much as you like. I tried to make mine look authentic.

After sanding, I painted the table with one coat of polyacrylic protective finish and let it dry.

And here is the finished piece! Since it's Autumn, I decorated my table with some pinecones and mini tiger pumpkins. I also have a key dish on the table and a basket under the table to hold my rain boots and umbrellas.


Monday, September 30, 2013

Have A GREAT Life


My reading of this book was long overdue and I am happy to say, I recently finished it and gained a renewed sense of inspiration and enjoyment for my personal macrobiotic practice.

Practicing macrobiotics has the potential to be a big challenge. I often hear people say, "I don't have time to do all that cooking." I used to feel that way at times. But it seems, once I get things going, make a plan and get into a rhythm, my practice becomes something interesting, inspiring, fun and spiritual. It is more than just food, it is an attitude, a way of living.

The Great Life Diet is written in a short and simple way. It's only 124 pages and includes a few recipes in the back as well as dietary guidelines for healing. This book is great for anyone who wants to improve their health, improve their macrobiotic practice or just refresh their knowledge. It inspired me to get back to the basics and really listen to my body as well as give it what it needs. Macrobiotics can be a gentle, mindful and peaceful way of eating and living that will help you cultivate more gentleness and peace with yourself and others. All you have to do is listen, sit, chew, have gratitude and recognize how beautiful this life is.

Gratitude is the way to be happy.

Check out this book. You will most likely learn something that will improve your life if you put it into practice. Happy reading!
http://www.amazon.com/Great-Life-Diet-Practical-Fulfillment/dp/1933648260/ref=sr_1_2?s=books&ie=UTF8&qid=1380546001&sr=1-2&keywords=the+great+life+cookbook


Wednesday, June 5, 2013

Soap = Hope


At this past Green Festival in NYC I came across a really cool little soap company. As you probably know, I am obsessed with natural body care products and love to try out new soaps see new products that are on the market. This company, SoapBox Soaps, is a company that not only produces a great quality product, they also distribute soap to children in need. They basically adopted the Tom's Shoes One for One idea, so that for every bar of soap you purchase, SoapBox Soaps donates a bar to a child in need, as well as to local struggling families, homeless shelters, women's shelters and nursing homes. What a cool way to make our purchases - knowing that when we buy something, we are also providing for another person!

I thought this was a great idea, and even better, I didn't have to compromise my values to support this worthy cause. SoapBox Soaps contain all natural ingredients, gluten-free oatmeal, organic shea butter and sea salt. All of their soaps are cruelty-free, made in America, packaged with 100% recycled fibers and 35% post consumer waste and vegan. LOVE IT!!!

I think I bought 6 bars and am working my way through each delicious smelling flavor.


https://www.soapboxsoaps.com/

Wednesday, May 8, 2013

Comfortable Organic Cotton Underware


Comfort is key when it comes to the undergarments we wear. After a long day of running around shopping and cooking for clients, taking care of kids or cleaning up and doing laundry, I want to be comfortable.

One really comfortable garment made by Blue Canoe is the Cami Bra. This bra is light and breathable, made out of 87% organic cotton and 13% spandex. It has an elastic band at the bottom and straps that don't slip, so you never need to worry about readjusting or falling straps as you move. These bras are also not itchy and perfect for hot weather!

If you are looking for a new bra and value comfort, the environment and your health, I highly recommend the Cami Bra. Here is a link and picture:

Blue Canoe Cami Bra


Blue Canoe is a small company that uses organic cotton and bamboo fabrics to create excellent quality undergarments and active wear for women. All of their garments are made in San Fransisco and the company practices fair and local trade.

Monday, March 11, 2013

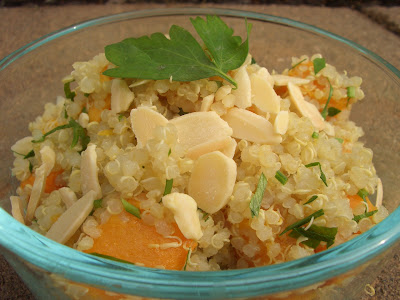
Kosher for Passover: Roasted Butternut Squash & Quinoa Salad


I've been doing some research and have tried to find some delicious looking healthy, vegan and kosher for Passover recipes. What a challenge! Not just vegan, not just kosher for Passover, but also healthy and delicious... I also wanted to come up with easy recipes that anyone can make that would have easily accessible ingredients. You can get everything at your local kosher grocery store.

Here is one that I came up with recently. I will definitely be making it this year!

Roasted Butternut Squash & Quinoa Salad

  • 1 large butternut squash
  • 1 Tbsp olive oil
  • 1/2  tsp sea salt
  • 1/2 tsp garlic powder
  • 2 cups quinoa
  • fresh parsley, finely chopped
  • sliced toasted almonds


  1. Preheat your oven to 400 degrees.
  2. Peel the butternut squash and slice into 1 inch cubes.
  3. Place the squash on a lined baking sheet and toss with oil, salt and garlic powder.
  4. Roast the squash in the oven for 40 minutes or until very soft. Roasting until very soft will make it creamy, buttery and sweeter.
  5. While the squash is roasting, rinse the quinoa and then place it into a large pot with 3 ⅓ cup water.
  6. Bring the pot to a boil, add a pinch of salt and then simmer for 20 minutes with the lid on.
  7. After 20 minutes, set the quinoa aside to cool.
  8. Once the squash is roasted, toss it with the quinoa and parsley in a large bowl. Garnish it with almonds just before serving.

Tuesday, January 8, 2013

Making Healthy Food FUN for Kids (and Adults)!


If you have kids, then you probably know how challenging it can be to get them to eat healthy foods. Kids often have access to sugary sodas, candy, chips and other processed snacks during their school day. This can be a real hindrance if you are wanting your kids to grow up healthy, strong and developing good habits for when they become older.

I have been recently working with a family and their two children who are 6 and 8 years old. These kids LOVE candy. And ice cream. And sugary drinks. All they care about is treats when they get home. Getting these kids to eat a piece of fruit daily is like a miracle! Yesterday I made them their usual dinner - something frozen that you pop into the oven for a few minutes. I also made them a whole bunch of delicious raw fruit and vegetables, cut into bite sized pieces. I arranged the fruit and veggies in a fun way on a platter in the center of the table, and I let each child pick what they wanted. And you know what? They actually ate it! Seriously. I have never seen these kids eat so much healthy food at dinner.

Here are some easy tips for getting YOUR kids to eat healthier:


SHAPE
One big thing that makes healthy food more appealing is the way it is cut. If you give a kid a giant carrot out of the bag, they probably won't eat it. But if you cut up a bunch of fruits and veggies in fun shapes and bite sized pieces arranged nicely on a plate, ready and waiting for them, they are WAY more likely to eat it. Having fun with this doesn't have to be complicated. Use a small cookie cutter to make hearts, stars and other cute shapes.

You can even do a fun project with your kids to cut fruits, veggies, bread or tortillas into cool shapes with small and medium sized cookie cutters. You can make easy sandwiches with the bread and quesadillas or wraps with the tortillas. Adults will even love it. I know that when I make a fun soup with star shaped carrots or heart shaped radishes, it makes eating more enjoyable.


COLOR
When thinking in terms of color, here is an easy way to make things more exciting. Rainbows! Kids love rainbows. Rainbows make people feel happy. Try arranging your foods in rainbow order. Talk about the different colors on the plate with your kids. Talk about flavors and textures and take the time to help them experience why eating well is important. Talk about antioxidants. Kids really listen and will appreciate the time you spend with them in this way.


TASTE
Eating foods that taste good is important to kids and adults! If you try to give people things they don't like, they will just rebel. So start with the things they do like. I found out the other day that the kids I work with like oatmeal. They only like to eat it with sugar on top. So, I let them have sugar on their oatmeal because at least it is getting them to eat oatmeal! Baby steps.


TOGETHER
When your kids see you eating something healthy, they will want to copy you. When the kids I work with see me eating blueberries or salad, sometimes they will come over and ask if they can taste it. They often times like it. When you take care of your self by eating well, your kids will see it and also want to.

Here are some questions to ask yourself when preparing snacks and dinner for your kids:

  • Are the vegetables or fruits cut in an interesting or artful way?
  • Did you use a variety of ingredients, flavors, and colors?
  • Are the colors of the dish you prepared vibrant and lively?
  • Is the food arranged in a fun way on the plate?
  • Are you using a colorful plate that makes eating more exciting?
Wishing you success in raising a healthy and happy family, and future generations.